Mudanças entre as edições de "Upgrade Ship 5"
m |
|||
| (3 revisões intermediárias por 2 usuários não estão sendo mostradas) | |||
| Linha 1: | Linha 1: | ||
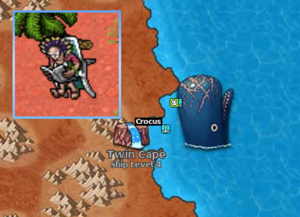
[[ | [[File:Local Crocus.png|thumb|link=|Location of '''Crocus''': Twin Cape Island.]] | ||
{{Quest | {{Quest | ||
|localizacao = Grand Line, | |localizacao = Grand Line, at Twin Cape | ||
|requisitos = | |requisitos = A level 28 character, A level 4 ship | ||
}} | }} | ||
__TOC__ | __TOC__ | ||
= | = Sedative for Laboon = | ||
---- | ---- | ||
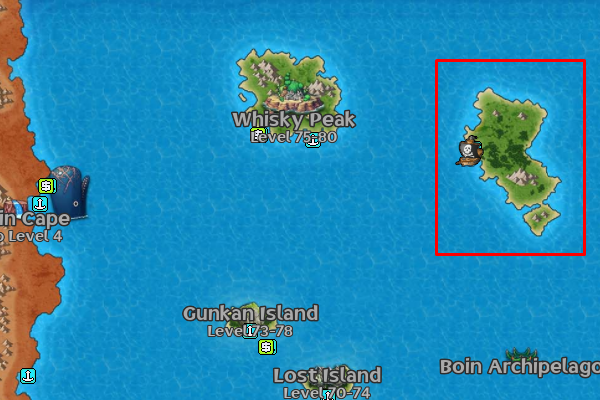
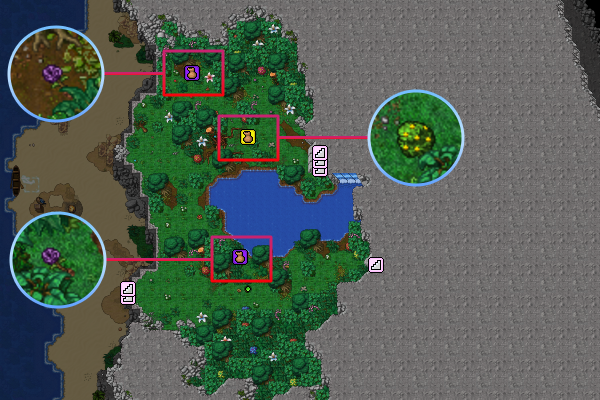
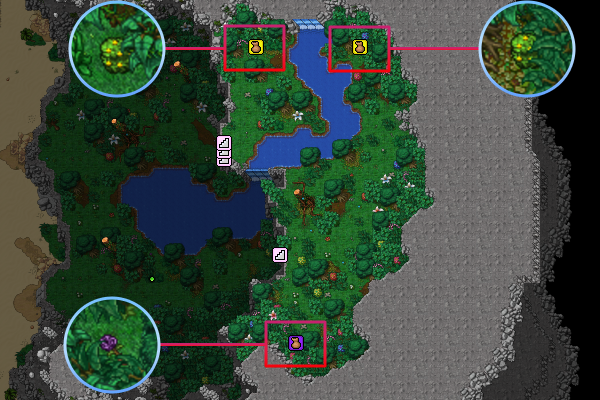
Crocus | Crocus asked you to collect '''3 Mysterious Purple Flowers''' and '''15 Mysterious Yellow Fruits'''. They can be found on an island to the '''east''' of Twin Cape. | ||
<center> | <center> | ||
<div style="display:flex; flex-wrap:wrap; justify-content:center; gap:8px;"> | <div style="display:flex; flex-wrap:wrap; justify-content:center; gap:8px;"> | ||
<div style="box-sizing:border-box;"> | <div style="box-sizing:border-box;"> | ||
[[ | [[File:LocalFloresShipLv5.png|link=|frame|Island where you can gather the necessary items for the sedative]] | ||
</div> | </div> | ||
<div style="box-sizing:border-box;"> | <div style="box-sizing:border-box;"> | ||
[[File:ItensMisteriosos1.png|link=| | [[File:ItensMisteriosos1.png|link=|frame|First floor: 2 Mysterious Purple Flowers and 1 Mysterious Yellow Fruit]] | ||
</div> | </div> | ||
<div style="box-sizing:border-box;"> | <div style="box-sizing:border-box;"> | ||
[[File:ItensMisteriosos2.png|link=| | [[File:ItensMisteriosos2.png|link=|frame|Second floor: 2 Mysterious Yellow Fruits and 1 Mysterious Purple Flower]] | ||
</div> | </div> | ||
</div> | </div> | ||
</center> | </center> | ||
After collecting the items, return to Twin Cape and deliver them to Crocus. He will reward you with: | |||
{{Reward|itens=Cotton:38, oak_log:30, Berries.gif:2000}} | {{Reward|itens=Cotton:38, oak_log:30, Berries.gif:2000}} | ||
= | = The Strongest Sedative = | ||
---- | ---- | ||
Crocus | Crocus now needs you to create a '''powerful sedative''' for Laboon. He will give you the following items: | ||
{{Reward|ignore=1|itens= | {{Reward|ignore=1|itens=Mysterious Petals:20, Piece of Mysterious Fruit.png:30}} | ||
Before starting the recipe, purchase these ingredients: | |||
{{Reward|ignore=1|itens= | {{Reward|ignore=1|itens=Water:1, Rosemary:1, Honey:1, Chamomile:1}} | ||
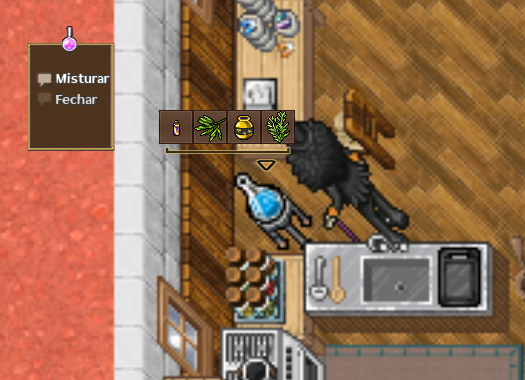
Now follow the recipe steps: | |||
#Crush the Mysterious Fruit Parts in the '''mortar''' to get '''Mysterious Juice''' {{Icon|IconMysterious Juice.png|align=2px}} | |||
#'''Boil''' the '''Water''' with the '''Mysterious Petals''' to create '''Mysterious Water''' {{Icon|IconMysterious Water.png|align=2px}} | |||
#'''Mix''' the '''Mysterious Juice''' and '''Mysterious Water''' and let it rest on the '''cutting board''' to obtain '''Mysterious Mix''' {{Icon|IconMix Mysterious.png|align=2px}} | |||
#Place the Mysterious Mix, Chamomile, Honey, and Rosemary into the '''Erlenmeyer flask''' to complete the Sedative {{Icon|IconSedative.png|align=2px}} | |||
[[File:MisturaCrocusFinal.png|center|link=|frame|Final step: combining everything in the Erlenmeyer flask]] | |||
Deliver the '''Sedative''' {{Icon|IconSedative.png|align=2px}} to Crocus. He will reward you with: | |||
{{Reward|itens=berries.gif:10000, cola:1, iron ore:24, superior gun powder:5}} | {{Reward|itens=berries.gif:10000, cola:1, iron ore:24, superior gun powder:5}} | ||
= | = Caring for Laboon = | ||
---- | ---- | ||
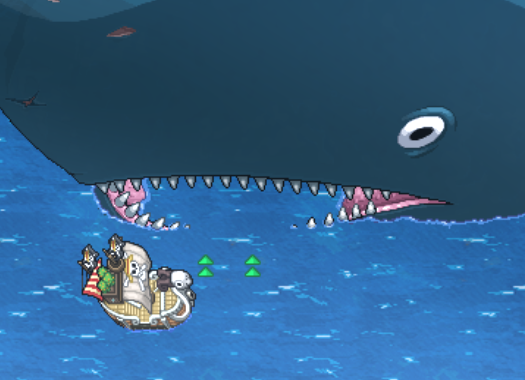
Crocus | Crocus asks you to enter Laboon's stomach, defeat the monsters, and apply the medicine to the internal wounds. | ||
Head into the sea and enter '''Laboon’s mouth'''. A special mission will begin. Your goals are: | |||
* | * Defeat the '''Sea Kings''' inside Laboon | ||
* | * Apply the sedative to the '''three internal wounds''' | ||
You can apply the sedative without defeating nearby enemies, but to complete the mission, all monsters must be defeated. | |||
<center> | <center> | ||
<div style="display:flex; flex-wrap:wrap; justify-content:center; gap:8px;"> | <div style="display:flex; flex-wrap:wrap; justify-content:center; gap:8px;"> | ||
<div style="box-sizing:border-box;"> | <div style="box-sizing:border-box;"> | ||
[[ | [[File:LocalBocaLaboonShipLv5.png|link=|frame|Mission entrance]] | ||
</div> | </div> | ||
<div style="box-sizing:border-box;"> | <div style="box-sizing:border-box;"> | ||
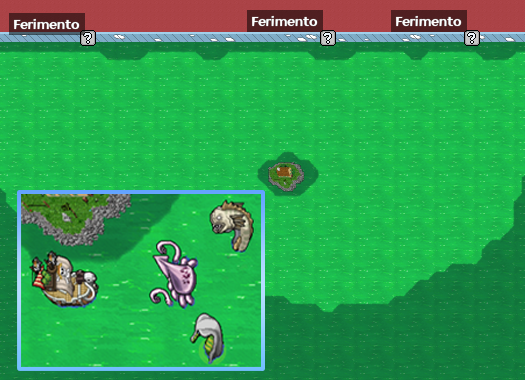
[[ | [[File:FerimentosLaboon.png|link=|frame|Locations of the '''3 wounds''' inside Laboon and monsters you'll face]] | ||
</div> | </div> | ||
<div style="box-sizing:border-box;"> | <div style="box-sizing:border-box;"> | ||
[[ | [[File:LocalFerimentoLaboonShipLv5.png|link=|frame|Visual of a '''wound'''. Just interact to apply the sedative]] | ||
</div> | </div> | ||
</div> | </div> | ||
</center> | </center> | ||
After healing all wounds and defeating the monsters, return to '''Crocus''' to finish the mission. He will reward you with: | |||
{{Reward|itens=Cotton:20, oak_log:30, Berries.gif:800}} | {{Reward|itens=Cotton:20, oak_log:30, Berries.gif:800}} | ||
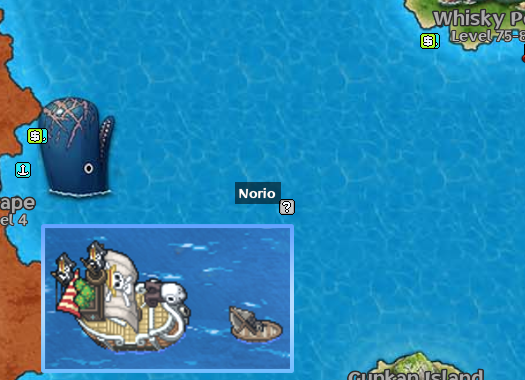
= | = Looking for Norio = | ||
---- | ---- | ||
Crocus | Crocus asks you to find '''Norio''' to the southeast. Head to the marked location on the map. | ||
[[ | [[File:LocalNorioShipLv5.png|center|link=|frame|'''Norio''' can be found southeast of Twin Cape]] | ||
Talk to '''Norio''' to complete this step. | |||
== | == Escorting Norio == | ||
---- | ---- | ||
Norio | Norio will ask for your help to safely return to '''Twin Cape'''. This is a special mission where '''death has no penalty'''. | ||
During the escort, you will face '''6 monsters'''. | |||
Upon completing the escort, you’ll receive: | |||
{{Reward|itens=oak log:20, Cotton:23, Berries.gif:808}} | {{Reward|itens=oak log:20, Cotton:23, Berries.gif:808}} | ||
After reaching Twin Cape, talk to '''Crocus'''. He will reward you with: | |||
{{Reward|itens=Berries:2000, Pose:1|ilha=Twin Cape}} | {{Reward|itens=Berries:2000, Pose:1|ilha=Twin Cape}} | ||
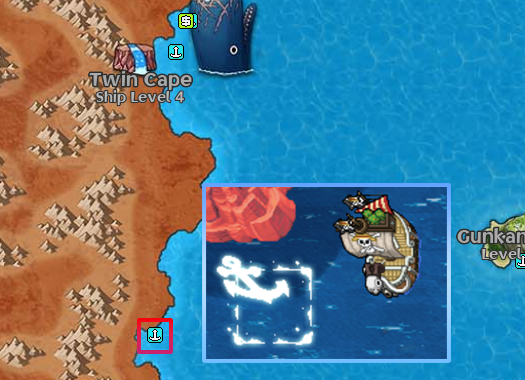
= | = The Stolen Shipment = | ||
---- | ---- | ||
Norio | Norio reported that his ship was damaged and may never sail again. Crocus asks you to investigate the wreckage and find out where the Shipment went. | ||
The looters headed southwest. Interact with the wreckage to proceed. | |||
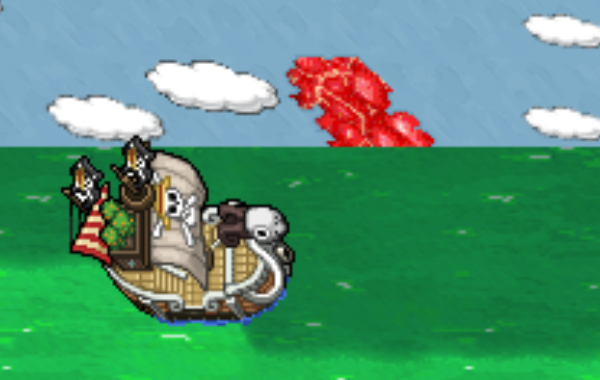
[[ | [[File:LocalDestroçosShipLv5.png|center|link=|frame|Interact with the '''wreckage''' to the southwest to begin the investigation]] | ||
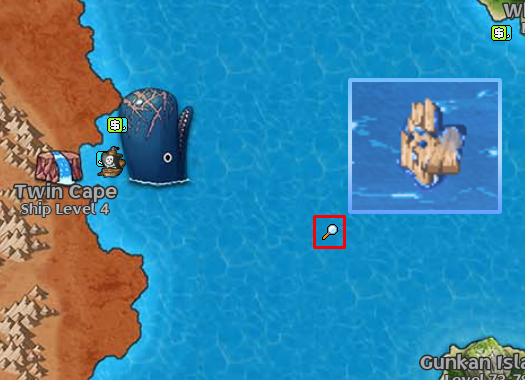
== | == The Stolen Cargo – Tracking the Clues (Parts 2, 3, and 4) == | ||
---- | ---- | ||
Continue | Continue investigating by heading to the marked locations with the magnifying glass icon {{Icon|IconLupaquest.png|align=1px}}. | ||
You only need to interact at each location. Once the final clue is found, the mission will progress automatically to Part 5. | |||
== | == The Stolen Cargo – Part 5 == | ||
---- | ---- | ||
Head to the thieves’ hideout further to the '''southwest''' and enter. | |||
<center> | <center> | ||
<div style="display: flex; flex-wrap: wrap; justify-content: center; gap: 8px;"> | <div style="display: flex; flex-wrap: wrap; justify-content: center; gap: 8px;"> | ||
<div style="box-sizing: border-box;"> | <div style="box-sizing: border-box;"> | ||
[[ | [[File:EsconderijoShipLv5.png|link=|frame|Thieves’ hideout entrance]] | ||
</div> | </div> | ||
<div style="box-sizing: border-box;"> | <div style="box-sizing: border-box;"> | ||
[[ | [[File:EscadasEsconderijoShipLv5.png|link=|frame|You’ll encounter many '''BW Millions'''. Recommended level: '''70+''']] | ||
</div> | </div> | ||
<div style="box-sizing: border-box;"> | <div style="box-sizing: border-box;"> | ||
[[ | [[File:CaminhoEsconderijoShipLv5.png|link=|frame|On the top floor, go right down the hallway to find '''Miss Wednesday''']] | ||
</div> | </div> | ||
</div> | </div> | ||
</center> | </center> | ||
Talk to her and '''threaten''' until she reveals the cargo’s location. | |||
== | == The Stolen Cargo – Part 6 == | ||
---- | ---- | ||
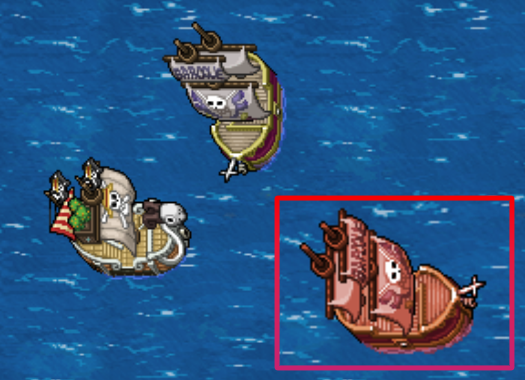
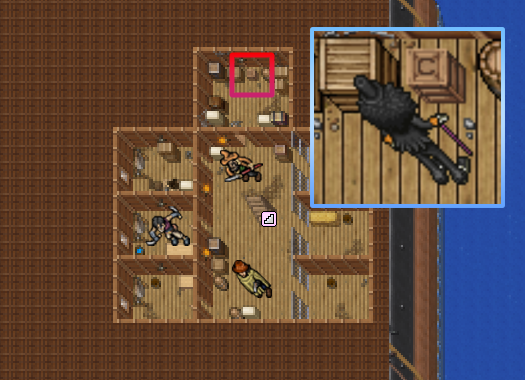
Miss Wednesday | Miss Wednesday reveals that '''Mr. 9''' took the cargo to '''Whisky Peak'''. The cargo is marked with a '''C'''. | ||
Look for the Baroque Works ship nearby. | |||
<center> | <center> | ||
<div style="display:flex; flex-wrap:wrap; justify-content:center; gap:8px;"> | <div style="display:flex; flex-wrap:wrap; justify-content:center; gap:8px;"> | ||
<div style="box-sizing:border-box;"> | <div style="box-sizing:border-box;"> | ||
[[ | [[File:NavioBaroqueWorksShipLv5.png|link=|frame|Defeat the ship. When it flashes red, '''interact/click''' to enter the instance]] | ||
</div> | </div> | ||
<div style="box-sizing:border-box;"> | <div style="box-sizing:border-box;"> | ||
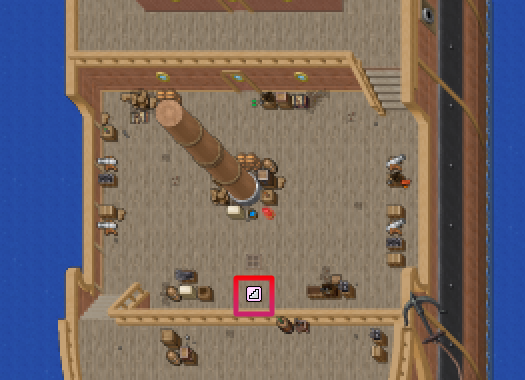
[[ | [[File:InstanciaNavioBWShipLv5.png|link=|frame|Inside the ship, defeat the '''BW Millions''' and go downstairs to find the cargo]] | ||
</div> | </div> | ||
<div style="box-sizing:border-box;"> | <div style="box-sizing:border-box;"> | ||
[[ | [[File:LocalCargaCrocusShipLv5.png|link=|frame| | ||
<div style="text-align:center;"> | <div style="text-align:center;"> | ||
Go to the marked spot to retrieve the stolen cargo. You can destroy the cages to release pirates who will help defeat the BW Millions on that floor. | |||
</div>]] | </div>]] | ||
</div> | </div> | ||
</div> | </div> | ||
</center> | </center> | ||
After recovering the cargo, go back upstairs and exit through the ship’s right side. | |||
== | == The Stolen Cargo – Final == | ||
---- | ---- | ||
Return to Twin Cape and deliver the recovered cargo to Crocus. He will reward you with: | |||
{{Reward|itens=Superior gun powder:5, iron ore:20, Cotton:25, Berries.gif:2000}} | {{Reward|itens=Superior gun powder:5, iron ore:20, Cotton:25, Berries.gif:2000}} | ||
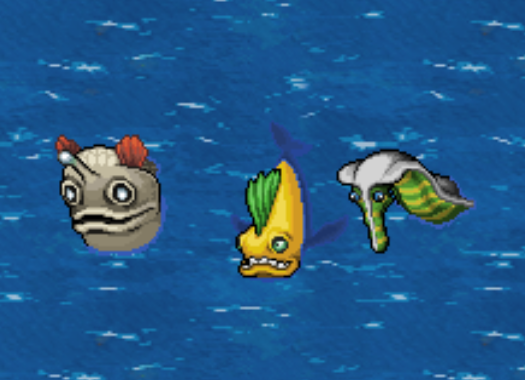
= | = Fearless Navigator = | ||
---- | ---- | ||
Crocus | Crocus now wants you to prove your sailing skills in the Grand Line. You must defeat: | ||
*7x Thunong | *7x Thunong | ||
*7x Shaking | *7x Shaking | ||
*7x Serpion | *7x Serpion | ||
[[ | [[File:UpgradeShipQuestFinal.png|link=|center|frame|You can find '''Serpions''' north of Whisky Peak, '''Thunongs''' at Boin Archipelago, and '''Shakings''' west of Whisky Peak.]] | ||
Once all are defeated, return to Crocus. | |||
{{Reward||itens=Berries.gif:5000, Cola:3, Superior gun powder:10, Cannon ball:4, Iron ore:60, Cotton:85, Oak log:70}} | {{Reward||itens=Berries.gif:5000, Cola:3, Superior gun powder:10, Cannon ball:4, Iron ore:60, Cotton:85, Oak log:70}} | ||
| Linha 182: | Linha 181: | ||
{{Predefinição:Achiev | {{Predefinição:Achiev | ||
|imagem = Tecnologia_de_navio | |imagem = Tecnologia_de_navio | ||
|titulo = | |titulo = Ship Tech V | ||
|descricao = | |descricao = Arsenal level 5 unlocked! | ||
|itens = Chest key piece:1, Profile icon box:1 | |itens = Chest key piece:1, Profile icon box:1 | ||
}} | }} | ||
Edição atual tal como às 02h30min de 29 de setembro de 2025
- A level 28 character
- A level 4 ship
Sedative for Laboon
Crocus asked you to collect 3 Mysterious Purple Flowers and 15 Mysterious Yellow Fruits. They can be found on an island to the east of Twin Cape.
After collecting the items, return to Twin Cape and deliver them to Crocus. He will reward you with:
The Strongest Sedative
Crocus now needs you to create a powerful sedative for Laboon. He will give you the following items:
Before starting the recipe, purchase these ingredients:
Now follow the recipe steps:
- Crush the Mysterious Fruit Parts in the mortar to get Mysterious Juice

- Boil the Water with the Mysterious Petals to create Mysterious Water

- Mix the Mysterious Juice and Mysterious Water and let it rest on the cutting board to obtain Mysterious Mix

- Place the Mysterious Mix, Chamomile, Honey, and Rosemary into the Erlenmeyer flask to complete the Sedative

Deliver the Sedative ![]() to Crocus. He will reward you with:
to Crocus. He will reward you with:
Caring for Laboon
Crocus asks you to enter Laboon's stomach, defeat the monsters, and apply the medicine to the internal wounds.
Head into the sea and enter Laboon’s mouth. A special mission will begin. Your goals are:
- Defeat the Sea Kings inside Laboon
- Apply the sedative to the three internal wounds
You can apply the sedative without defeating nearby enemies, but to complete the mission, all monsters must be defeated.
After healing all wounds and defeating the monsters, return to Crocus to finish the mission. He will reward you with:
Looking for Norio
Crocus asks you to find Norio to the southeast. Head to the marked location on the map.
Talk to Norio to complete this step.
Escorting Norio
Norio will ask for your help to safely return to Twin Cape. This is a special mission where death has no penalty.
During the escort, you will face 6 monsters.
Upon completing the escort, you’ll receive:
After reaching Twin Cape, talk to Crocus. He will reward you with:
The Stolen Shipment
Norio reported that his ship was damaged and may never sail again. Crocus asks you to investigate the wreckage and find out where the Shipment went.
The looters headed southwest. Interact with the wreckage to proceed.
The Stolen Cargo – Tracking the Clues (Parts 2, 3, and 4)
Continue investigating by heading to the marked locations with the magnifying glass icon ![]() .
.
You only need to interact at each location. Once the final clue is found, the mission will progress automatically to Part 5.
The Stolen Cargo – Part 5
Head to the thieves’ hideout further to the southwest and enter.
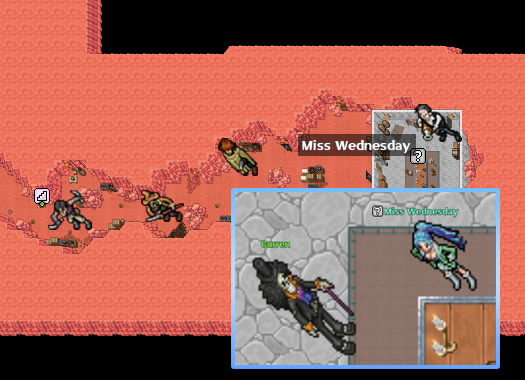
Talk to her and threaten until she reveals the cargo’s location.
The Stolen Cargo – Part 6
Miss Wednesday reveals that Mr. 9 took the cargo to Whisky Peak. The cargo is marked with a C.
Look for the Baroque Works ship nearby.
After recovering the cargo, go back upstairs and exit through the ship’s right side.
The Stolen Cargo – Final
Return to Twin Cape and deliver the recovered cargo to Crocus. He will reward you with:
Crocus now wants you to prove your sailing skills in the Grand Line. You must defeat:
- 7x Thunong
- 7x Shaking
- 7x Serpion
Once all are defeated, return to Crocus.